Sorry, I have not been great about taking pictures, but the way things have been going if I waited to take a picture, every time I posted I would post even less than I do now. I have been doing a farm share this summer for meat, cheese and veggies. While it has been great, I have found small servings of meat in my freezer that I am wondering what to do with. I think other night I found a solution. I found some beautiful spare ribs from the Farm Institute on Martha's Vineyard in my freezer. I was going to grill them but the portions were pretty small, and mostly bone. I remember my in-laws telling me that there mother used them for her Italian gravy. Then I went through my freeze, found some single vacaum sealed sausages, I did fill in with some stuff from Stop and Shop but created quite a good meat sauce. I found a recipe on Food Network for crockpot gravy, but by the time I read the reviews I changed it so much that I can claim it as my own. It was real easy and fed a lot of people. I know I am a little a obsessed with my crockpot, but with baby number 2 on the way I am sure there will be a lot more crockpot entries. I had to use an extra step, but worth it, is browning the meat and sauteing the veggies, but you can handle it. I have a a great crockpot that I splurged on from Williams and Sonoma, an All Clad. It has a ceramic insert, but if I had held out the newest model has a cast iron insert where you can brown the meat and veggies in the same pot with less dishes to do. I have found for most crockpot recipes that browning the meat and onions before makes a difference. It is another step but worth it. This is a great dish for a crowd and you can freeze the left overs.
Crockpot Italian Gravy
printable recipe
inspired by the Food Network Kitchens
Olive Oil
2-4 lbs of meat (whatever you like, ie. Italian sausage, meatballs, spareribs cut into pieces, beef shins)
1 onion
2-3 cloves of garlic
2 tbs of tomato paste (if you look around at your grocery store you can find tomato paste in a tube rather than a can, more expensive but worth it because you can refrigerate the leftovers for less waste)
1/2 cup of red wine
2 28oz. cans of tomato sauce (you could crush whole tomatoes, but I like mine a little soupy)
1 28oz. can of crushed tomatoes ( I try to buy them in a box when I can find them)
2 bay leaves
salt and pepper to taste
Suggested pasta: rigatoni or ziti
1. Using a stock pot or a dutch oven heat oil (about 1 tbs.) on medium high. Once hot, sprinkle meat with salt and pepper and brown meat in batches so that it browns rather than steams. After browning put meat in crock pot.
2. Add an additional tbs. of oil and cook onions until translucent. Add garlic and cook about 30 seconds then add tomato paste. Cook for about 1 minute. You want to take to the crunch out of the vegetables.
3. You are going to use the wine to deglaze the pan, letting it steam and scrap up brown bits, about a minute. Once finished add mixture to the crook pot.
4. Add sauce and tomatoes to crook pot along with bay leave. Add a little sauce and pepper.
5. Cook on low for 8 hours, check on it if you can you want meat tender and you may have to adjust time depending on your crook pot. Some run hotter than others.
6. Once finished skim any fat off the top and adjust seasoning.

Here is our little piece of our Cape Cod life on the internet. See the fun we have being "townies" on the Cape and what we like to cook. Formally "The Valle Kitchen" I have updated the site to include activities we enjoy on the Cape. Welcome and Enjoy!
Thursday, September 30, 2010
Wednesday, August 18, 2010
A Very Belated 4th of July Cake and Ice Cream

I have had this picture on my computer since the 4th, but life happens and not until now was I able to write a post. This is the Barefoot Contessa flag cake and it was so good! It also look beautiful. As much as I love making cupcakes, I am now thinking a sheet cake is the way to go to feed a crowd. This recipe is pretty easy and Ina does it as a flag, but you could easily decorate it for the occasion. The fresh fruit on top tasted great with the cream cheese frosting. I like cakes that use cream cheese frosting because it is really easy and doesn't melt as easily as butter-cream, which can be temperamental in the hot weather. I don't bake a lot because I have a really serious sweet tooth, so cream cheese frosting is much easier for me to make. The cake feeds a lot of people, so consider it for you next party.
Because I am too lazy to type out the whole recipe for you here is the link: http://www.foodnetwork.com/recipes/ina-garten/flag-cake-recipe/index.html
Wednesday, August 11, 2010
Master Chef? Probably Not. Omelet Part 2

So last night I watched "Master Chef", it is Gordan Ramsey's newest show where he turns an amateur cook into a master chef. I love food competition shows, especially "Top Chef". Most of the "Top Chef" challenges I know I would fail miserably, but I thought with "Master Chef" I would probably have more of a chance. The first challenge was to slice and dice onions, OK I can do that and I have to admit that I am pretty good at it. So I think I would make it through the first round. The second round was to make the perfect egg and they only got one egg. This is where I would have Gordan yelling in my face reducing me to tears, telling me it was "f-ing disgusting". Eggs are surprisingly hard. I thought there would be many contestants out on this one, but I was wrong. These so called amateur chefs came up with some pretty sophisticated dishes. I mean most people can scramble or fry an egg and it is pretty edible, even good, but to make it look and taste like a professional is something else entirely. As you have seen in previous post I have attempted a french omelet and the result would have defiantly have me handing in my apron.
After last nights' show and my desire to get back to my blogging, I attempted Julia Child's scrambled omelet. The easier option, opposed to her folded omelet. The picture above speaks for itself. I think that is what it is suppose look like, but who knows. I have to admit it tasted pretty good and I think I got that right. It was lightly browned on the inside and creamy in the middle, although a little undercooked. I only used 3 eggs, some chopped parsley and salt and pepper. No cheese or cream, I felt the creaminess in the center from the technique made there no need for cheese but I am sure you could add it if you wanted. It also helped that Julia provided me with pictures, (I am a visual person).
Basically, you turn your pan up very high and melted a tbs. of butter in the pan. Once pan is hot and butter is melted swirl it around and to coat the pan and then add eggs. Take the handle and tilt it upward while moving the eggs around with a fork around in a circular motion, the eggs should be custard like in 3-4 second. Then keeping the pan tilted, push the eggs with the fork toward the bottom half of the pan folding it over the eggs that are there and then bang the pan a few times to loosen. If you have "Mastering the Art of French Cooking" and want to try this, follow Julia's description and not mine. Julia says this takes a lot of practice. So imagine if you were one of these poor contestants on "Master Chef" and you only had 1 egg. No wonder way, as creative as the dishes were, there were no omelets.
Well overall the results were tasty and there was very little egg stuck to the pan, so I guess it was a success. I will give myself the benefit of the doubt that it was a scrambled omelet, it was more scramble eggy than omelety. When I moved the eggs with the fork, they did not come off in on solid piece and I think that what it is suppose to do.
Last night I had a thought about "would I try out for Master Chef?" Never say never, but I do not think I could hack it. But, at least at home, if nobody likes my food they are nice about it. No one screams in my face and spit it out.
Monday, June 7, 2010
Who put seltzer in my waffle?

Buttermilk Waffles
adapted from "Cook's Illustrated" June 2010
printable recipe
printable recipe
2 cups all purpose flour
1 tbs. sugar
3/4 teaspoon table salt
1/2 cup dried buttermilk powder (in the baking section at Stop and Shop)
1/2 tsp. baking soda
1/2 cup sour cream
2 large eggs
1/4 teaspoon vanilla extract
1/4 cup vegetable oil
1 1/4 unflavored seltzer water (just open is perferrable)
1. Place rack in the middle of the oven and preheat to 250.
2. Heat up waffle iron.
3. Whisk the first 5 ingredients together in a large bowl. Set aside.
4. In separate bowl whisk together sour cream, eggs, vanilla and oil. Then gently stir in seltzer using a rubber spatula.
5. Make a well in the middle of the dry mixture and slowly add wet ingredients. Mix until just combined. The batter will be slightly lumpy.
6. Spray waffle maker lightly with cooking spray and add about 1/3 a cup of batter for each waffle. Adjust amount according to your waffle maker.
7. Cook until golden brown, keep each batch in the oven until you are ready to eat, up to 10 minutes.
*They reheat well in toasted in a toaster oven
Saturday, May 29, 2010
Happy Memorial Day! Here's an app to have with your wine! (Bruschetta 3 Ways)
*I had great pictures to go with this, but I think I erased them. Typical pregnancy brain!
Sorry to my few readers about my very long absence. We are very excited expecting our 2nd baby in November, but I have been very nauseous so I have been keeping the cooking to a minimum. Expect a lot of desserts and "safe" food, nothing to crazy. But I have hit my 2nd trimester, she I have had some inspiration.
Happy Memorial Day! Make this app, watch the Cape Cod sunset and have a glass of wine for me (since I cannot have one). . Bruschetta is the old stand by appetizer, but I have to say it is my favorite, when done well. I have had a lot bad Bruschetta, soggy bread, grainy tomatoes. But when it is done right it is perfect. Although this is an app, it makes a very filling meal with a salad and the use of whole grain bread. Especially if you are ambitious and do all three. Now the tomatoes this time of year of not that good, but I posted the classic bruschetta anyway. You can either save the recipe for summer or if you find a semi-decent tomato, a lot of olive oil and vinegar will improve it greatly. The mushroom bruschetta recipe was inspired by some bruschetta I had at Mario Batali's "Lupa". They use some pretty fancy mushrooms with sheep's milk ricotta, which I couldn't find at Stop and Shop. I used some pretty nice cow's milk ricotta and it was great, but not the same. If you can find real sheep's milk ricotta, give it a shot. The third recipe, white bean and goat cheese, was inspired by stuff I found in my pantry and fridge. Enjoy!
printable recipes
Classic Bruschetta
1 baguette sliced
1 minced clove of garlic
about 1 tsp. salts
2 large tomatoes or 4 plum tomatoes chopped
1 tbs. balsamic vinegar
2 tbs. olive oil
salt and pepper to taste
1. Heat broiler on low to preheat. Place baguette slices on a cookie sheet and toast in the oven, flipping once.
Watch very carefully, it should only take a few minutes.
2. Mix garlic and salt on a cutting board, smashing with a knife to make a paste. I find it cuts down on the raw garlic taste, but still only kiss people who have shared this dish with you.
3. Mix salt, garlic, tomatoes, balsamic vinegar, and olive oil. Taste and adjust seasonings.
4. Top bread with tomato mixture and serve.
(If serving later keep bread and topping separate until ready to serve)
Mushroom Ricotta
1 baguette sliced
1 tbs. olive oil
1 tsp. butter
salt and pepper to taste
2 -4 oz package of mixed mushrooms
1/4 cup of white wine
1/2 tsp. fresh thyme
1 small container of ricotta cheese
truffle oil (optional)
1. Heat broiler on low to preheat. Place baguette slices on a cookie sheet and toast in the oven, flipping once.
Watch very carefully, it should only take a few minutes.
2. Adding salt and pepper, saute mushrooms on medium-high heat in olive oil and butter until mushroom are browned and remove from pan and set aside.
3. Add wine and thyme to pan and reduce by about half. Add mushroom mixture, lower heat and set aside.
4. Mix ricotta with salt and pepper and top each slice with about a tbs. of ricotta and some of the mushroom mixture.
5. Drizzle with truffle oil and serve.
White Bean and Goat Cheese
1 baguette sliced
olive oil
1 cup of white beans cooked
1/4 cup of goat cheese crumbled
1/2 tsp. fresh chopped rosemary finely chopped
salt and pepper to taste
1/4 cup walnuts
1. Heat broiler on low to preheat. Place baguette slices on a cookie sheet and toast in the oven, flipping once.
Watch very carefully, it should only take a few minutes.
2. Add olive oil to a saute pan on medium heat. Add beans to pan and warm through smashing beans as you go.
3. Remove from heat and mix in goat cheese, rosemary, salt and pepper, set aside.
4. In a dry pan, heat and lightly toast walnuts.
5. Top each baguette sliced with bean mixture and walnuts,then serve.
Friday, March 12, 2010
"Don't you just love a bargain"..Great Cookbooks at the Christmas Tree Shop
Like most people who like to cook, I love cookbooks! I have a huge collection and just when I think that I have enough, I find just one more that will change my life, its a problem. For a while HomeGoods was my stop for cookbooks. I would see a book I wanted at Williams and Sonoma and wait a few weeks and then find it on sale at HomeGoods. Now I have seen great cookbooks at Christmas Tree Shop and even cheaper than HomeGoods! I got the newest Martha Stewart's Cooking School book for a 3rd of the price of Williams and Sonoma. Just $10!
I recently found a great recipe for one of my bargain finds, "Vineyard Harvest" by Tina Miller with Christie Matheson and photos by Alison Shaw. I think it was $6.99. I love Martha's Vineyard, they have some great farms and this book highlights that with great seasonal menus. Some of the recipes are intermediate to difficult, but some are very easy. I made a pizza recipe from book and I loved it! Below is my adaptation of it. If you come across this book, its worth the $6.99 especially if you are from the Cape. I was a little sad that such a beautiful, thoughtful, cookbook was only so inexpensive.
One of my favorite recipes from the book was the spinach and goat cheese pizza. The flavors went together very well, especially the rosemary. Just use very little because it can be over powering. I got some truffle oil at HomeGoods, I drizzled it on the pizza, it was delicious. Always the bargain shopper!

Spinach and Goat Cheese Pizza
Adapted from Tina Miller
1 red onion cut into eighths
Olive oil as necessary (recipe calls for 6 tbs. I used less)
1 bag of spinach washed and stems picked off
A pinch of salt and pepper
Dough for 1 8in pizza (I buy Trader Joe's, they even have whole wheat)
cornmeal as needed
1 tsp. fresh chopped rosemary (maximum!)
1 tsp. parsley
1 clove of garlic minced
1/3 cup crumbled goat cheese
optional: truffle oil (I found some at HomeGoods)
1. Heat oven to 350. Toss onions with olive oil to completely coated.and spread onto a cookie sheet. Roast onions for about 15-20 minutes, until onions are lightly browned and soft. Set aside. Turn the oven up to 500. If using a pizza stone put it on the bottom rack now.
2. While oven is heating up, heat some oil on medium-high , about a tbs., in a saute pan. Add spinach, salt and pepper to pan and saute until wilted. Set aside.
3. Stretch out the pizza dough, then roll out onto a floured surface until thin. This part is a little tricky. If you do not have a pizza stone place dough on a parchment paper covered cookie sheet. Or put the cornmeal and dough on a pizza paddle. I do not have one of those pizza paddles, so I very carefully slide the rack with the stone out and sprinkle cornmeal on stone. Place dough on the stone.
4.Drizzle olive oil, sprinkle on rosemary, salt, pepper and parsley on dough. Top with spinach, onions and goat cheese. If you have a paddle slide it onto the stone.
5. Bake for about 10 minutes or until crust is brown and cheese is soft.
6. If you have truffle oil drizzle with truffle oil and serve.
Sunday, February 28, 2010
Meat-Less Mondays (Minestrone alla Romagnola)
During Sara's nap time my usual distraction from doing housework is browsing various food blogs. While poking around I stumbled upon Gwyneth Paltrow's blog Goop. While it seemed a little fabulous for a typical Cape Cod housewife and mother, there was one newsletter that intrigued me Meat-Less Mondays. Although I eat pretty much anything, I feel I eat really healthy. But I have never had the discipline to be vegetarian or vegan. I saw the movie "Food, Inc." and was blown away! While the movie is quite graphic with visions of slaughter houses, it was very eye opening. I will not get on a soap box about eating grass-feed meat and processed food, I think it is unrealistic to be perfect all the time. Having done some reading and personal research into our food and where it comes from, I have become more conscience of what I eat and feed my family. I do not want to be unrealistic, because sometime I just need an Oreo. I like the idea of Meat-Less Mondays because it was a very realistic way to eat more consciously and try new things. On Mondays or Tuesdays I will be featuring a vegetarian recipe. As much as I have tried, I do not like tofu, so I will promise you tofu free recipes. I am trying to take recipes I already enjoy and make them Meat-Less. If you are interested in the Meat-Less Monday these website are much better at describing the benefits to your health and the planet than I am. There is Meat-Less Mondays U.K. and Meat-Less Monday U.S. Both are really informative and have great recipes.
I found in my house that one of the easiest way to do a Meat-Less night is by making soup. It is filling and there are so many vegetarian soup recipes that it is not hard to find one you like. And usually everyone in my family will eats it.
My first feature is Minestrone Soup. Again my recipe is inspired by Essentials of Classic Italian Cooking by Marcella Hazan. Her recipe for Minestrone alla Romagnola is my favorite minestrone recipe. Her version is made with homemade beef stock, which I have made and it is fantastic, but I made a vegetarian version with homemade veggie stock which was perfect for Meat-Less Mondays. I also varied the measurements and some of the vegetables. For the best flavor follow the steps although it is a bit time consuming. What I have done is followed all of the steps and then if I had to leave for the day I have let it simmer in the crock-pot. The recipe says the use of the crust parmigiano-reggiano scraped clean is optional, but if you can add it I think it really makes the soup. What I will do is freeze the hard crust of my parm and save them for soups and sauces. It is also great in a tomato sauce.

Minestrone alla Romagnola
Printable Recipe
Inspired by Marcella Hazan's Essentials of Classic Italian Cooking
1/2 cup olive oil
3 tbs. butter
1 large sliced onion
2 diced carrots
2 diced celery stalks
2 diced potatoes
1/4 lb green beans trimmed and cut into 1 in pieces
2 small diced zucchini
1 medium diced summer squash
3 cups of shredded cabbage
1 1/2 cups cooked white beans
6 cups of vegetable stock
Optional: 1 crust from a piece of parmigiano-reggiano
2/3 cup canned plum tomatoes in their juices.
salt
grated parmigiano-reggiano cheese
1.In a large stock pot heat oil and butter on low and add onions once butter melts. Cook onions until pale gold.
2. Add carrots and cook for about 2-3 minutes, then repeat with celery and potatoes.
3. Add green beans and cook for 2-3 minutes then add zucchini and summer squash. Cook ingredients for a few minutes before adding cabbage. Once cabbage is added cook for another 5 to 6 minutes.
4. Add broth, cheese crust, tomatoes and salt.
5. Lower heat to a simmer and cover, stirring occasionally. Let cook 2 1/2 hours then add beans and cook for another 30 minutes.
6. Before serving remove cheese crust and add cheese and salt to taste. I like to serve it with grated cheese on top, it tastes better the next day!
Friday, February 12, 2010
Beets for people who do not like beets and want to.

I saw a recipe in Martha Stewarts' Everyday Food that was shredded carrots and beets and I also saw a similar recipe in the Moosewood Restaurant New Classics Cookbook called beautiful beet salad. These recipes both used raw beets. I combined these recipes and came up with my own. I liked the orange juice in Martha's recipe and the ginger in the Moosewood recipe. I added some agave nectar for sweetness. I like agave because it is not too sweet and it is light. If you cannot find it or if it is too expensive you can us a little honey. I would put the honey in the microwave for about 20 seconds to make it a little thinner. A good place to get agave is my favorite spot Trader Joe's, it is a lot less than at the grocery store. It is great on oatmeal and supposedly it doesn't mess with you blood sugar.
Since making this salad I eat it about once a week, I am the only one in my house eating it so it is usually for lunch with some left over chicken on the side. My husband or daughter are still a little weary, but at least the beets will be getting eaten. I can now say that I like beets, next onto the turnips....
Shredded Beet and Carrot Salad with Ginger-Citrus Dressing
Printable Recipe
3 beets
3 small or 2 medium carrots
1 tbs. orange juice
1 tbs. cider vinegar
2 tbs.olive oil
1 tsp grated ginger
1 tsp. agave nectar (or honey)
salt and pepper to taste
Serves 3-4
1. Wash beets, cut off and trim bulb. Save greens and slice off tough stem. Take your knife and separate central red vain going up greens from the greens. Set aside.
2. Take beet bulbs and shred them though the food processor or grater. Once grated set in a colander and rinse until water runs mostly clear. Let them drain in the sink while you prepare the rest of the ingredients. Occasionally run water through beets.
3. Peel carrots and shred them though the food processor or grater. Place in a bowl and set aside.
4. Take the greens and place one on top of the other. Roll them up and slice into ribbons and add to carrots.
5. To make dressing whisk together orange juice, cider vinegar, olive oil, ginger, agave nectar (if using honey microwave for 20 seconds to make thinner) salt and pepper to taste.
6. Add shredded beets to carrot mixture and toss with dressing. Eat immediately.
*To increase servings easily add a bag of spring mix and double the dressing.
Saturday, January 30, 2010
Who's afraid of Jacque Pepin's classic french omelet? (I am) Part 1
I have read many articles about how difficult it is to make a good omelet and to cook an omelet perfectly is a sign of an accomplished cook/chef. Omelets are a staple in our house, an easy, pretty healthy dinner. I usually take the easy way out, throw some eggs, milk and filling in a pan with plenty of cheese, sometimes it looks like an omelet, sometimes it turns into one of my famous "scrambles". When goofing around on the computer I saw Jacques Pepin's "Fine-Herbes Omelet" http://www.cookstr.com/recipes/fines-herbes-omelet-conventional-and-classic
I read the conventional version, which resembled something like a typical Valle family version, but this time I was intrigued by the classic. It looked simple and pretty healthy. It included butter, but only about 1 1/2 teaspoons, it was basically eggs, herbs, salt and pepper and a little butter. I had to read the recipe several times to understand it, but I think I finally got it. I have made it twice and it looks a little sad, I should have taken a picture. But it tasted great, it was nice and creamy without adding any cheese or tasting like runny eggs. I would really like to get it down so it looks and tastes beautiful. This is my newest challenge and it is pretty hard. At least the mistakes taste good. Once I get it down, I would like to do a picture by picture recipe and post it. I need pictures, I am a visual learner when it comes to techniques. My problem is it keeps sticking to the pan, I used a cast iron skillet. If any one has any suggestions, I would be grateful. To be continued.........
I read the conventional version, which resembled something like a typical Valle family version, but this time I was intrigued by the classic. It looked simple and pretty healthy. It included butter, but only about 1 1/2 teaspoons, it was basically eggs, herbs, salt and pepper and a little butter. I had to read the recipe several times to understand it, but I think I finally got it. I have made it twice and it looks a little sad, I should have taken a picture. But it tasted great, it was nice and creamy without adding any cheese or tasting like runny eggs. I would really like to get it down so it looks and tastes beautiful. This is my newest challenge and it is pretty hard. At least the mistakes taste good. Once I get it down, I would like to do a picture by picture recipe and post it. I need pictures, I am a visual learner when it comes to techniques. My problem is it keeps sticking to the pan, I used a cast iron skillet. If any one has any suggestions, I would be grateful. To be continued.........
Wednesday, January 27, 2010
Dinner with Anthony Bourdain (well, sort of)
A few weeks ago my friend Becky and her husband went to see Anthony Bourdain speak in Lowell. I was so jealous! I love Anthony, I watch "No Reservations" all the time and "Kitchen Confidential" one of my top ten books. So you could just imagine my excitement when the Boston Globe said he was coming to Providence to speak! I talked T, my husband, to go with me. After all those hours fishing, he could take one for the team. He had no idea who we were going to see or what he was going to talk about. T was just really excited to get off the Cape and have a nice dinner.
What a lucky night, first we got our tickets upgraded so we were 7 rows from the stage. We had a wonderful dinner at McCormick and Schmicks and at the booth next to us was Anthony Bourdain! I was so excited and freaked out! T had offered to get me a picture, but I was way too nervous, I didn't want to bother him during his dinner. I am so neurotic, that if it went bad and we annoyed him I would have not enjoyed the show. Although we didn't talk to him it was still very cool.
The show was interesting and hilarious, and T loved it as well. It defiantly was worth crossing the bridge. T bought me the "Les Halles" cookbook that night. He's the best husband, and he is lucky to have me as a wife. Some women need diamonds and jewels to be happy, for me all it takes is a $40 cookbook.
At times I have these fantasy's about going to culinary school and opening a restaurant, I was set straight. After listening to Bourdian speak remember what hard work and crazy hours working in a restaurant is and I am happy just to have a hobby I really enjoy. I used to work in kitchens and it is hard work. Picture a 18 year old, sweat blond girl on the fry line with a few motor cycle dudes. I was in charge of breading and frying the seafood, not glamorous job, but that is a story for another time. While reading "Kitchen Confidential" I remember how hard it is to run a successful food business. I think I will continue to keep cooking as a hobby and a way to show love and caring for my family.
The next night I made my Sunday night roasted chicken, except this time I made, "Poulet Roti" from the "Les Halles" cookbook. It was came out delicious and the recipe was very descriptive. This is my new go to "company is coming dinner" dish. We had a very happy dinner table. The book has very clear, very specific instructions and the writing was clever, I actually read the books introduction. I will do a more specific post in the future, but here is a link from the blog "Almost Bourdain" that does a nice job:
http://almostbourdain.blogspot.com/2009/06/anthony-bourdains-poulet-roti-french.html
Sunday, January 24, 2010
If you have a few hours, make a Bolognese Sauce
Just like many areas in the country, it has been a super cold and snowy 2010 on Cape Cod. I was really excited when I got my Kitchen Aid mixer pasta attachment. These two factors inspired me to make an authentic Bolognese Sauce and I have to say it was fabulous!! It took most of the day, but once you get the hang of it, its every easy.
My inspirations was Marcella Hazan "Essentials of Classic Italian Cooking". When I bought this book, I was trying to decide between this one and the "Silver Spoon Italian Cookbook". I decided on the "Essentials of Italian Cooking" because it was more basic and looked really easy to follow. Many of the recipes are time consuming, but easy, t and clear. Everything I have made from this book is fantastic This is one of my favorite books. On a snowy day I like to make something to simmer on the stove all day. I think my version may have taken longer than the Hazan version because I doubled it.

Here is my version is pretty much the same as Marcella Hazon, but I doubled it and used pork and beef instead of only beef.

Bolognese Sauce
Based on the recipe by Marella Hazon from " Essentials of Italian Cooking"
3 tbs. of butter
2 tbs. of oil
1 cup chopped onion
1 1/2 cup chopped carrots
2/3 cup chopped celery
1 lb ground beef
1 lb ground pork
pinch of nutmeg
2 cups of milk
2 cups white wine
1 28 oz. tomatoes
salt and pepper to taste
1. Melt butter with oil in a stock pot.
2. Add onions and cook until soft, then add carrots and celery and cook until soft.
3. Add beef, pork and nutmeg and brown meat.
4. Once browned add the milk and bring to a simmer. Leave on a very slow simmer until all of the milk has simmered away, about 30-45 minutes. Stiring occasionally.
5. Add wine and simmer slowly until all of the wine has simmered away about 30-45 minutes. Stiring occasionally
6. Chop tomatoes and add to sauce along with juices. Bring to a simmer and simmer for no less then 3 hours.

I served it on homemade fettuccine and it was great! Sorry the picture is not so great and you do not need a lot of sauce for the pasta. I froze the left overs and they were a good weeknight meal.
Saturday, January 9, 2010
Jeannine takes on Julia
So I finally saw "Julie and Julia". It was a very entertaining and fun chick flick and I would recommend it. I am not ambitious enough to cook all the recipes in Mastering the Art of French Cooking but I was inspired to try at least one. I love to make roasted chicken, I make it at least twice a month and lately it has been the old reliable for a last minute dinner guest. I decided to take a stab at "Poulet Poele a L'estragon" a fancy way of saying "Casserole-roasted Chicken with Tarragon". Mastering the Art of French Cooking Here is the link to the official recipe (its one of Meryl Streep's favorites): http://www.lhj.com/recipes/easy/chicken/meryl-streeps-amy-adams-julia-child-recipes/?page=2
It was real good and that's because it contained a lot of butter. This is not something I would make that often because I was very uncomfortable with the amount of butter. I had thought about halving it, but then I realized that if I was going to take this on I had to take it on whole heartedly (be that a heart that now just a little closer to some cholesterol medication). I try to follow the recipe exactly and I think it worked out for me. My husband liked how moist it was, but he is not into tarragon, which I love. But I thought you could easily substitute garlic or some other flavor.
The recipe did not have many ingredients, basically a chicken, tarragon, onions, carrots salt, pepper and butter. There was a "Brown tarragon sauce" that was suggested to go with it, but I found the chicken juices were plenty.

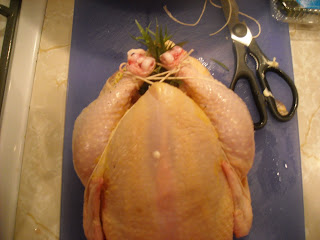
The recipe took you step by step, so although there were many steps they were easy to follow. I started with a cleaned chick and covered it with about 4 tbs of butter inside and out then stuffed it with tarragon. Make sure it is dried well so that it browns well.


It was real good and that's because it contained a lot of butter. This is not something I would make that often because I was very uncomfortable with the amount of butter. I had thought about halving it, but then I realized that if I was going to take this on I had to take it on whole heartedly (be that a heart that now just a little closer to some cholesterol medication). I try to follow the recipe exactly and I think it worked out for me. My husband liked how moist it was, but he is not into tarragon, which I love. But I thought you could easily substitute garlic or some other flavor.
The recipe did not have many ingredients, basically a chicken, tarragon, onions, carrots salt, pepper and butter. There was a "Brown tarragon sauce" that was suggested to go with it, but I found the chicken juices were plenty.


Next step was to truss it, which was I can say did not come out like Julia's. She used a huge poultry needle to truss, which I did not have, so I kinda just made it up. I figured at least if the legs were tied securely that was good enough.

The next part was a little awkward. I had to brown the entire chicken in a dutch oven (which I didn't have so I used a medium stock pot). Let's just say we were lucky there were no major injuries.

Once the chicken was browned I took it out of the pan and , yes, added more butter and sauteed the onions and carrots.

Once soft, I put the chicken in the oven and roasted it with the lid on and topped chicken with aluminum foil the for about 1 hour or more in a 375 oven. Mine my have cooked quickier because of the pot I used.
I basted it a couple times as well.
\

Here is the finished product, we were in such a hurry to eat we forgot to take a picture right away. When it was done I carved it and pour the pan juices over it. By the time I remembered we had eaten half of it. I know this picture is not that attractive, but it really was fantastic.

http://www.lhj.com/recipes/easy/chicken/meryl-streeps-amy-adams-julia-child-recipes/?page=2
Tuesday, January 5, 2010
Holiday Baking
I cannot believe it is already 2010!! Wow, I have had no time to blog and I have done a ton of baking. A ton of eating sweets as well! I also have a 2 year old that has given up napping so the blogging has suffered greatly. Here are some of the highlights. At the beginning of the month I made some beautiful red velvet Martha Stewart cupcakes from "Martha Stewart's Cupcakes".  I have to say they were beautiful and tasted pretty good. I have never made red velvet and they were very good, but I had this weird idea that they would taste like chocolate. They were not as chocolaty as I would like, but still good. My favorite is still chocolate. I suggest if you are looking for a good buttercream frosting recipe this has been my favorite, because it makes so much. I found other recipes did not make enough for me to decorate. I would end up driving to the store to buy more ingredients. It also took me a while to get the knack of making it.
Martha Stewart's Red Velvet Cupcakes
Adapted from "Martha Stewart's Cupcakes"
(link to Book via Amazon)
2 1/2 Cake Flour ( I used all purpose and add a little cornstarch to each cup)
2 tbs unsweetened Dutch-processed cocoa
1 tsp salt
1 1/2 cup sugar
1 1/2 cup vegetable oil
2 large eggs
1/2 teaspoon red gel food coloring
1 tsp pure vanilla extract
1 cup of buttermilk
1 1/2 tsp baking soda
2 tsp distilled white vinegar
Buttercream frosting (see below)
1. Preheat oven to 350. Line standard muffin tins with paper liners. Whisk together cake flour, cocoa and salt.
2. With and electric mixer on medium-high speed, whisk together sugar and oil until combined. Add eggs, one at a time, beating until each is incorporated, scraping down sides of the bowl as needed. Mix in food coloring and vanilla.
3. Reduce speed to low. Add flour mixture in three batches, alternating with two additions of buttermilk, and whisking well after each. Stir together the baking soda and vinegar in a small bowl (it will foam, like the volcano you made in science class); add mixture to the batter and mix on medium speed 10 seconds.
4. Divide batter evenly among lined cups, filling each three-quarters full. Bake, rotating tins half way through, until a cake tester inserted in centers comes out clean, about 20 minutes. Transfer tins to wire racks to cool completely before removing cupcakes.
* Buttercream Frosting
5 large egg whites
1 cup plus 2 tablespoons of sugar
4 sticks of butter
1 1/2 tsp pure vanilla extract
1. Combine egg whites, sugar and salt in the heatproof bowl of a standing mixer set over a pan of simmering water. Whisk constantly by hand until mixture is warm to the touch ( the mixture should feel completely smooth when rubbed by your fingertips).
2.Attach the bowl to the mixer fitted with the whisk attachment. Starting on low and gradually increasing to medium high speed., whisk until stiff (but not dry) peaks form. Continue mixing until the mixture is fluffy and glossy, and completely cool ( test by touching the bottom of the bowl), about 10 minutes.
3. With mixer on medium-low speed, add the butter a few tablespoons at a time, mixing well after each addition. Once all the butter has been added whisk in vanilla. Switch to the paddle attachment and continue beating on low speed until all air bubbles are eliminated, about 2 minutes. Scrape down the sides of the bowl with a flexible spatula and continue beating until frosting is completely smooth. Keep buttercream at room temperature if using the same day, or transfer to an airtight container and refrigerate up to 3 days or freeze up to a month. Before using, bring up to room temperature and beat with paddle attachment on low speed until smooth again, about 5 minutes.
4. To make into wreaths I frosted all the cupcakes white, then I put a little aside and whisk it with green food coloring a little at a time until I got the color I wanted. I then made wreath shape by putting the green into a pastry bag and using a a small leaf tip. I would put leaves on the cupcake in a circle fashion, overlapping until I had desired design. I used a red gel frosting decorating tube to make the berry dots.
I also made these delish salted chocolate truffles from the pioneer women. They were really tasty and super easy. Here is the recipe: http://thepioneerwoman.com/cooking/2009/10/chocolate-truffles-with-sea-salt/

The yearly cookie swap I always look forward to seeing what people make and to dust off my old cookie recipes. This is the second year I have made the Blue Ribbon Almond Roca cookies. I love these cookies, that is way I only make them for Christmas.
I got the recipe on the Food Network website: http://www.foodnetwork.com/recipes/emeril-live/blue-ribbon-almond-roca-cookies-recipe/index.html
Now that the holidays are over I am going to focus on healthy recipes. All of these came out fantastic, but I am on sugar overload.

 I have to say they were beautiful and tasted pretty good. I have never made red velvet and they were very good, but I had this weird idea that they would taste like chocolate. They were not as chocolaty as I would like, but still good. My favorite is still chocolate. I suggest if you are looking for a good buttercream frosting recipe this has been my favorite, because it makes so much. I found other recipes did not make enough for me to decorate. I would end up driving to the store to buy more ingredients. It also took me a while to get the knack of making it.
Martha Stewart's Red Velvet Cupcakes
Adapted from "Martha Stewart's Cupcakes"
(link to Book via Amazon)
2 1/2 Cake Flour ( I used all purpose and add a little cornstarch to each cup)
2 tbs unsweetened Dutch-processed cocoa
1 tsp salt
1 1/2 cup sugar
1 1/2 cup vegetable oil
2 large eggs
1/2 teaspoon red gel food coloring
1 tsp pure vanilla extract
1 cup of buttermilk
1 1/2 tsp baking soda
2 tsp distilled white vinegar
Buttercream frosting (see below)
1. Preheat oven to 350. Line standard muffin tins with paper liners. Whisk together cake flour, cocoa and salt.
2. With and electric mixer on medium-high speed, whisk together sugar and oil until combined. Add eggs, one at a time, beating until each is incorporated, scraping down sides of the bowl as needed. Mix in food coloring and vanilla.
3. Reduce speed to low. Add flour mixture in three batches, alternating with two additions of buttermilk, and whisking well after each. Stir together the baking soda and vinegar in a small bowl (it will foam, like the volcano you made in science class); add mixture to the batter and mix on medium speed 10 seconds.
4. Divide batter evenly among lined cups, filling each three-quarters full. Bake, rotating tins half way through, until a cake tester inserted in centers comes out clean, about 20 minutes. Transfer tins to wire racks to cool completely before removing cupcakes.
* Buttercream Frosting
5 large egg whites
1 cup plus 2 tablespoons of sugar
4 sticks of butter
1 1/2 tsp pure vanilla extract
1. Combine egg whites, sugar and salt in the heatproof bowl of a standing mixer set over a pan of simmering water. Whisk constantly by hand until mixture is warm to the touch ( the mixture should feel completely smooth when rubbed by your fingertips).
2.Attach the bowl to the mixer fitted with the whisk attachment. Starting on low and gradually increasing to medium high speed., whisk until stiff (but not dry) peaks form. Continue mixing until the mixture is fluffy and glossy, and completely cool ( test by touching the bottom of the bowl), about 10 minutes.
3. With mixer on medium-low speed, add the butter a few tablespoons at a time, mixing well after each addition. Once all the butter has been added whisk in vanilla. Switch to the paddle attachment and continue beating on low speed until all air bubbles are eliminated, about 2 minutes. Scrape down the sides of the bowl with a flexible spatula and continue beating until frosting is completely smooth. Keep buttercream at room temperature if using the same day, or transfer to an airtight container and refrigerate up to 3 days or freeze up to a month. Before using, bring up to room temperature and beat with paddle attachment on low speed until smooth again, about 5 minutes.
4. To make into wreaths I frosted all the cupcakes white, then I put a little aside and whisk it with green food coloring a little at a time until I got the color I wanted. I then made wreath shape by putting the green into a pastry bag and using a a small leaf tip. I would put leaves on the cupcake in a circle fashion, overlapping until I had desired design. I used a red gel frosting decorating tube to make the berry dots.
I also made these delish salted chocolate truffles from the pioneer women. They were really tasty and super easy. Here is the recipe: http://thepioneerwoman.com/cooking/2009/10/chocolate-truffles-with-sea-salt/

The yearly cookie swap I always look forward to seeing what people make and to dust off my old cookie recipes. This is the second year I have made the Blue Ribbon Almond Roca cookies. I love these cookies, that is way I only make them for Christmas.
I got the recipe on the Food Network website: http://www.foodnetwork.com/recipes/emeril-live/blue-ribbon-almond-roca-cookies-recipe/index.html
Now that the holidays are over I am going to focus on healthy recipes. All of these came out fantastic, but I am on sugar overload.

Subscribe to:
Comments (Atom)